Wireless Access
Getting connected on campus is easy with your login details. Our simple guides will get you setup in seconds.
Find out how you can set up on your device:
Android Connectivity Guide
Step 1.
Click Settings
Click Wireless & networks > Wi-Fi settings > select wifi@mp
Step 2.
- Select PEAP
- Select MSCHAPV2
- Enter your Student ID, or firstnamelastname for Staff (i.e. johnsmith) and password
- Leave Anonymous identity blank
- Click Connect
You should now be connected to wifi@mp
Android 11+ Connectivity Guide
Step 1.
- Go to https://www.digicert.com/kb/digicert-root-certificates.htm
- Scroll down to DigiCert Global Root G2.
- Tap Download DER/CRT.
- Go to Settings.
- Tap Security.
- Scroll to the bottom and tap Advance.
- Tap Encryption & Credentials
- Tap “Install a certificate”.
- Tap “CA certificate”.
- Tap Install Anyway.
- Under "Open from," tap where you saved the certificate.
- Tap the file.
Step 2.
- Go Back to Settings.
- Tap Network and Internet.
- Tap Wi-Fi.
- If you have already tried to connect to wifi@mp. Tap the settings button next to wifi@mp and tap "Forget".
- Tap wifi@mp.
- For EAP method set to PEAP.
- For Phase2 authentication select MSCHAPV2.
- Tap "Online certificate status" and select "Request certificate status".
- Tap "Domain" and enter "Clearpass-Pr.mp.edu.au".
- Tap "Identity" and enter your username.
- Tap "Password" and enter your password.
- Tap "Connect" and it should now connect to wifi@mp.
You should now be connected to wifi@mp
Step 1.
Click Settings
Click Wi-Fi
Step 2.
EAP Method: PEAP
Phase 2 Authentication: MSCHAPV2
Online Certificate Status: Request certificate status
Domain: mp.edu.au
Identity: Student ID or firstnamelastname for Staff (i.e. johnsmith)
Anonymous: Leave blank
Password: Your Melbourne Polytechnic password
iPhone/iPad iOS Connectivity Guide
Step 1.
Click Settings
Click Wi-Fi
Step 2.
Click wifi@mp
Step 3.
Enter your Student ID, or firstnamelastname for Staff (i.e. johnsmith) and password
Click Join
Step 4.
Click Accept
You should now be connected to wifi@mp
macOS Connectivity Guide
Step 1.
Click the wireless icon
Step 2.
Click wifi@mp
Step 3.
Mode-Should be set on Automatic.
Enter your Student ID, or firstnamelastname for Staff (i.e. johnsmith) and password
Check Remember this network
Click Join
You should now be connected to wifi@mp
Ubuntu Connectivity Guide
Step 1.
Click the wireless icon
Step 2.
Click wifi@mp
Step 3.
Select WPA and/or WPA2 Enterprise
Select Protected EAP (PEAP)
Select MSCHAPv2
Enter Student ID, or firstnamelastname for Staff (i.e. johnsmith) and password
Click Connect
Step 4.
Check Don't warn me again
Click Ignore
You should now be connected to wifi@mp
Windows 10/11 Connectivity Guide
Step 1.
Click the Wi-Fi icon on the taskbar.![]()
Step 2.
Click wifi@mp.
(Note: Check ‘Connect Automatically’ if you wish to connect automatically to the Wi-Fi when it is in range.)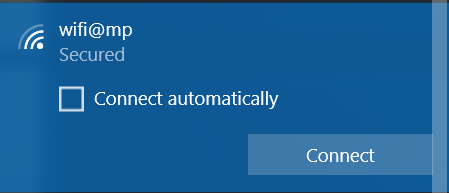
Step 3.
Click Connect.
Step 4.
Enter your Student ID, or firstnamelastname for Staff (i.e. johnsmith) and password
- Click Connect
- You should be connected to wifi@mp now
Other Devices Connectivity Guide
With so many different devices available, it's difficult to create a guide for each. Below are the settings that wifi@mp uses:
Radio Protocol: 802.11a/b/g/n 2.4 GHz and 5 GHz
Wireless Security: WPA-TKIP or WPA2-AES Enterprise
Authentication mechanism: 802.1x
Authentication protocol: PEAP
PEAP sub-protocol: MSCHAPv2
Cert Authority: Thawte Primary Root CA/Thawte DV SSL CA
These are some of the services that you can access via wifi@mp:
- HTTP, HTTPS and FTP (Web)
- IMAP, IMAPS and POP3 (Email)
- iTunes and Google Play
- Skype and Facetime
- Telnet, SSH and IPSec